Once the cap goes on the bottle, the induction seal is physically hidden. No camera — visible-light, UV, or hyperspectral — can see it. The only two options for detecting seal failures are pressure testing (destructive, sampling-based) and thermal imaging. Only one of those works at 100% inline speed without touching the product.
How Induction Sealing Actually Works
The sequence matters. The cap — with the foil liner already inside it — is applied to the bottle first. Then the capped bottle passes through an induction sealing tunnel. An induction coil inside the tunnel generates a high-frequency electromagnetic field. This field induces eddy currents in the aluminium foil liner, converting electromagnetic energy into heat. In milliseconds, the foil liner reaches 200–250°C. At this temperature, the bonding layer beneath the foil (typically a thermoplastic wax or polyethylene coating) melts and flows onto the bottle neck surface. As the bottle exits the tunnel and cools, this layer solidifies — creating a permanent adhesive bond between the foil and the bottle neck.
For the seal to hold against pressure and torque, two conditions must be met:
- Sufficient heat: The foil must reach bonding temperature across the entire seal area. Below this threshold, the bonding layer never wets the bottle neck surface.
- Complete coverage: Heat must be uniform around the full seal circumference. A single under-heated arc — even 5mm — breaks integrity at that point.
The failure modes are thermal and mechanical:
- Under-heated zones: Insufficient induction power, line speed too fast, or poor coil-to-bottle alignment. The foil never reaches bonding temperature. Adhesion is partial or absent.
- Over-heated zones: Excessive dwell time or power. The bonding layer carbonises and seal integrity is lost.
- Cut or damaged liner: Physical damage to the foil during bottle handling before sealing.
- Missing liner: Cap loaded without a liner, or liner displaced before reaching the tunnel.
- Partial contact: Bottle neck contamination (dust, moisture, oil residue) prevents the bonding layer from wetting evenly onto the substrate.
Why No Optical Camera Can Inspect the Seal
This is not a question of camera sensitivity or algorithm sophistication. It is a question of geometry.
Once the cap is applied, the foil liner sits inside the cap, pressed against the bottle neck — completely enclosed. The cap wall and top cover it on all sides. No visible-light camera, no matter how high-resolution, can image what it physically cannot see. The seal is not a surface — it is a bond that forms under the cap, hidden from view.
This rules out every optical inspection method:
- RGB cameras see the top and sides of the cap. Not the seal.
- UV or fluorescence imaging can detect certain contaminants on surfaces, but the seal is not on a visible surface.
- Hyperspectral cameras penetrate some materials, but not an opaque plastic or aluminium-backed cap at production speeds.
- X-ray systems can detect missing liners but cannot resolve the thermal bonding state of a present liner.
What optical systems can check — before the cap goes on — is foil presence, foil alignment, and foil damage. These are upstream checks, not seal integrity checks. A foil can pass all of them and still fail to bond if the induction sealing step is wrong.
How Thermal Imaging Reads What Is Inside the Cap
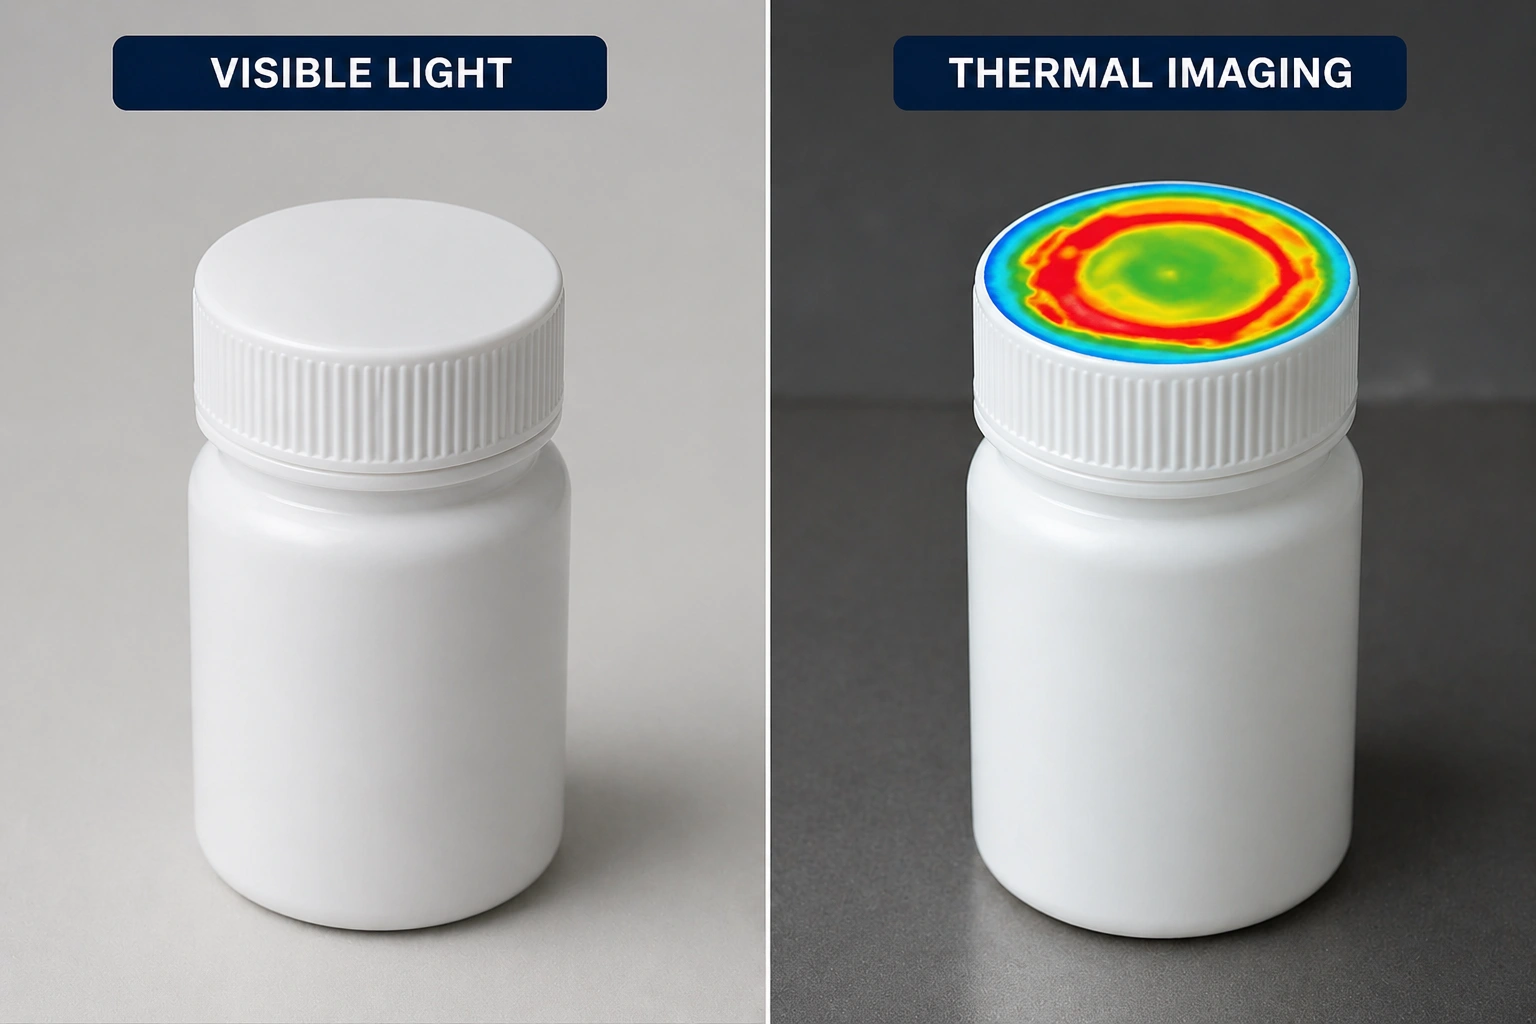
The induction sealing process deposits heat into the foil. That heat does not disappear the moment the bottle exits the tunnel — it radiates and conducts outward through the cap material for several seconds. A thermal camera positioned immediately after the tunnel detects this heat signature from outside the cap.
The AI image analysis then interprets the heat pattern. Each sealing condition creates a distinct thermal signature:
- Correctly sealed foil: Uniform thermal ring around the cap perimeter, consistent temperature 200°C+ immediately post-sealing, fading predictably over 8–15 seconds as the foil cools.
- Under-heated zone: The thermal ring shows a cooler arc or gap — the zone where the foil never reached bonding temperature. The AI flags the asymmetry.
- Over-heated zones: Elevated, uneven temperature gradient — the foil ran hotter than normal in specific areas, indicating power/speed imbalance.
- Missing liner: No thermal ring at all. There was no foil to heat, so no heat signature is present.
- Cut or damaged liner: A broken or irregular thermal ring, with a cold gap where the foil was absent or non-conducting.
The AI model is trained on thousands of reference images — good seals and defective seals — so it learns to identify these patterns reliably, even with variation in cap colour, line speed, and ambient temperature.
| Failure Mode | Pressure Test | Optical Camera | Thermal Imaging (ISIVS) |
|---|---|---|---|
| Under-heated seal (partial adhesion) | Can detect (destructive, sampling only) | ❌ Cannot — seal is inside the cap | ✅ Detects (reduced / asymmetric thermal ring) |
| Over-heated seal (burn-through) | Can detect (destructive, sampling only) | ❌ Cannot — seal is inside the cap | ✅ Detects (elevated temperature gradient) |
| Missing liner | Can detect (destructive, sampling only) | ⚠️ Can detect before capping only | ✅ Detects (absent thermal signal) |
| Cut or damaged liner | Can detect (destructive, sampling only) | ⚠️ Can detect before capping only | ✅ Detects (broken thermal ring) |
| Correct seal | Passes (on sample tested) | ❌ Cannot assess seal quality post-capping | ✅ Passes (uniform thermal ring, 100% of bottles) |
The Detection Window: Why Timing Matters
Thermal imaging is time-sensitive. The detection must happen within 8–15 seconds of the bottle leaving the induction sealing tunnel. Why?
Thermal dissipation: Aluminium foil has high thermal conductivity and a large surface area. It cools rapidly—approximately 10–15°C per second in ambient air. After 8 seconds, a correctly sealed foil drops from 200°C to ~100°C. After 15 seconds, it approaches ambient temperature. An under-heated seal, which never rose above 170°C, will be indistinguishable from ambient by the time it reaches the end of a slow line.
Line speed calculation: At a typical pharma or FMCG production rate of 100–300 bottles per minute (bpm):
- 200 bpm = 0.3 metres per second
- In 10 seconds, a bottle travels 3 metres
- A typical line is 1–2 metres from sealing tunnel to inspection station
The thermal camera must be positioned immediately after the sealing tunnel (within 0.5–1.5 metres). Placing it further downstream guarantees missed detections. This is a practical engineering constraint that separates a well-engineered system from a poor one.
What Most People Get Wrong
Two misconceptions consistently undermine induction seal quality programs:
1. "We do end-of-line visual checks — that's enough"
Visual checks — by human inspectors or optical cameras — can only see the outside of the cap. The cap top, the side-wall, the label. Not the seal. A correctly sealed bottle and an unsealed bottle look identical from the outside. A human inspector staring at 10,000 caps per hour will not catch a single under-heated seal. Neither will an optical camera, for the same reason: the seal is not visible.
2. "We pressure-test samples — that catches failures"
Pressure tests (blow-off or torque tests) do detect seal failures — but they are destructive. You test a sample and destroy those bottles in the process. You then extrapolate to the rest of the batch via AQL sampling. At typical AQL (0.65 or 1.0), you're sampling ~125 bottles from a 5,000-unit batch. If the defect rate is 0.05% — realistic for under-heated seals on a line with minor power drift — you will statistically miss failures on most batches. The unsealed bottles ship.
Pressure testing has a legitimate role in process qualification and periodic auditing. It does not replace 100% inline inspection.
The Production Numbers
To illustrate the scale of the problem, consider a typical nutraceutical production line:
- Line speed: 200 bottles per minute
- Shift length: 8 hours
- Seals per shift: 200 bpm × 60 min × 8 h = 96,000 bottles
- Defect rate (under-heated seals): 0.05% (conservative estimate, typical for induction sealing without temperature monitoring)
- Expected failures per shift: 96,000 × 0.0005 = 48 bottles
With AQL sampling (0.65 AQL, sample size 125):
- Probability of detecting a defect batch: ~63%
- Expected undetected failures per shift: ~18 bottles (38% escape rate)
- Undetected failures per year (250 shifts): ~4,500 bottles
With 100% thermal inspection:
- Detection rate: 99.7%+ (resolved down to 0.03°C temperature differentials)
- Undetected failures per shift: 0.15 bottles
- Undetected failures per year: ~37 bottles
The difference is dramatic: AQL sampling allows ~100x more defects to escape than 100% thermal inspection.
Practical Takeaway: What to Ask When Evaluating a Seal Inspection System
If you are evaluating a thermal imaging solution for induction seal inspection, ask these questions:
- Cooled or uncooled thermal camera? Cooled cameras (e.g., FLIR Boson, Teledyne QWIP) resolve 0.03°C differentials and are ideal for detecting under-heated seals. Uncooled cameras resolve ~0.1°C and are acceptable for obvious defects but miss marginal seals. If you need high confidence, cooled is worth the investment.
- What is the frame rate at your line speed? At 200 bpm (0.3 m/s), you need ~30 fps minimum to capture at least 2–3 frames of the foil while it's above 150°C. Ask to see thermal video of your actual line speed.
- How does the detection algorithm identify partial adhesion zones? Ask for a thermal image showing a defective seal and a good seal side-by-side. The algorithm should highlight cooler regions. If the vendor cannot show this, they don't have a detection algorithm.
- Reference case study: Optomech's ISIVS system was deployed at a Mumbai nutraceutical facility and achieved 99.97% seal integrity detection with a 94% reduction in consumer complaints related to seal failure. Ask your vendor for similar real-world validation.
- What is the installed cost? A thermal camera (cooled or uncooled), frame grabber, processing computer, and enclosure typically costs INR 4–8 lakhs for a production line. Is this included? What about integration, calibration, and training?
See the Difference Yourself
Watch a thermal imaging comparison between a correctly sealed bottle and a partial seal failure. Request a live demonstration on your production line.
Request a DemonstrationFrequently Asked Questions
No — and this is the most common misconception in induction seal quality programs. After capping, the foil liner is completely enclosed inside the cap. No optical camera can see through the cap wall to the seal. A visible-light camera inspecting a capped bottle sees the cap exterior — colour, geometry, label position. It has no access to the seal. Thermal imaging works precisely because it doesn't need to see the seal directly: it reads the heat that radiates through the cap material from the recently-heated foil. That heat signature reveals the seal's bonding state.
Both can detect seal failures, but with different sensitivity thresholds. Uncooled cameras (~INR 2–3 lakhs) resolve temperature differences of ~0.1°C and are adequate for detecting missing liners and severe under-heating. Cooled cameras (0.03°C sensitivity) are recommended for detecting marginal under-heated zones — partial seals where the foil reached 180°C instead of 200°C, for example. For pharma and nutraceutical applications where regulatory requirements mandate 100% seal verification, cooled is the safer choice. For general FMCG applications where severe failures are the primary concern, uncooled is an acceptable starting point.
Thermal inspection sits immediately after the induction sealing tunnel — typically 0.3–0.8 metres downstream. The thermal camera connects to a frame grabber (USB or GigE) and a processing PC running the AI inspection software. The software outputs a binary pass/fail signal per bottle, which integrates into your line PLC via relay output, Ethernet, or serial link. Rejected bottles are diverted to an accumulator without stopping the line. The system logs a thermal image and defect classification for every rejection, creating a full audit trail. Integration typically takes 1–2 weeks including calibration and line validation.
For a line running 200 bpm (96,000 bottles/shift, 250 shifts/year = 24M bottles/year) at 0.05% defect rate, thermal imaging prevents ~4,500 undetected failures annually vs. AQL sampling. At INR 500–1,000 per consumer complaint (recall, replacement, regulatory fine), thermal imaging pays for itself (INR 5–8 lakhs capital cost) in 3–6 months. For pharma manufacturers where a single recall event can cost several crores, the payback is almost immediate. Optomech's ISIVS deployment at a Mumbai nutraceutical facility delivered a 94% reduction in consumer seal complaints in the first quarter of operation.